Surreal Head Stack Photo Manipulation Photoshop Tutorial
Welcome To My Website, Here You Get All Editing Effects.These Effects are used in Photo scape and Photoshop. As Always we come up with new effects and tutorials for our viewers.Today We are Introducing Glowing Text In Photoshop. In This Tutorial "Surreal Head Stack Photo Manipulation " . This is new technique introduce by respective photoscape owners. We our going to share it with you, we hope that you may take help from it. If you have any question or need help then mail us at our given id.
Please must share it with your friends & family. Press above share button.
photoescapeeding@gmail.com
Keep Looking At Our Website:
Provided By Owner(AymeSoni)
Surreal Head Stack Photo Manipulation
Step 1
Download and Open in Photoshop the Rural Self Portrait photo. Using Rectangular Marquee tool, create selection around the head and shoulder area like on the screenshot.
Step 2
Use Image> Crop to crop selected area, deselect with Ctrl+D. Now we get a nice close up view.
Step 3
Using Pen tool, create selection path covering shoulder and head area perfectly.
Right click the paths, choose Make Selection from the pop up menu. Click OK to transform path into selection.
Copy selected area to a new layer by pressing Ctrl+J.
Step 4
Draw an ellipse path using Ellipse tool, this path will mark the cut area of the head later. Edit the path�s bottom part using Direct Selection and Path Selection tool, so the path will arched following the nose shape.
Step 5
In order to create thickness for the cut area, create a second elipse path or simply duplicate the first one.
Hold Alt while dragging the first path, this way the path will be duplicated when you start dragging it. With the second path still selected, click subtract from shape area button.
Go to Edit> Free Transform to reduce second path�s size and re-align its position to the center of the first path.
Step 6
Open the Paths panel (go to Window> Paths in case you didn�t know), click Load path as selection button to change the path into selection.
Step 7
Go back to Layers panel, duplicate selected area to a new layer by pressing Ctrl+J.
We also need to duplicate the half head layer. When you done duplicating layers, hide the rim cut and background layer.
Step 8
Drag full head layer to the topmost layer stack. Within the Paths panel, select rim cut path we created earlier and then Load this path as selection.
Step 9
Add layer mask for half head layer, do this while holding Alt button. This will change the selection into layer mask. And because you hold Alt button, the color of layer mask become inverted. Now we get a hole in the face.
Step 10
Continue masking using hard round brush tool until the upper head part is completely hidden. Make sure you set the brush color to black when continue masking.
Step 11
Show the rim cut layer, you should saw the curve white lines now. Remove this curve white lines by continue masking on the half head layer using smaller brush, and set the brush color to white.
Step 12
Our selection on Step 3 seems to leave some hair texture on the ears. Repair this flaws using a newclipping mask layer and Clone Stamp tool. Sample a clean skin texture near the ears area to cover the hair texture. Because we�re working in different layer, make sure Sample: All layers option is selected from the option bar.
Step 13
Add a new clipping mask layer above rim cut layer. Using Eyedropper tool, pick highlights and shadows color samples from the face and set them as the foreground and background color.
Step 14
Ctrl+Click rim cut�s layer thumbnail to create a selection. Expand selection area about 2px wide by going to menu Select> Modify> Expand.
Use Filter>Render> Clouds menu to fill the selection with cloud filter. Not satisfied with the result? You can repeat the clouds filter by pressing Ctrl+F.
Deselect with Ctrl+D when you�re done.
Step 15
Use Burn and Dodge tool to manually define shadows and highlight areas in the cut texture layer. Make sure you pick Range: Midtones and use low Exposure value for both tools.
Step 16
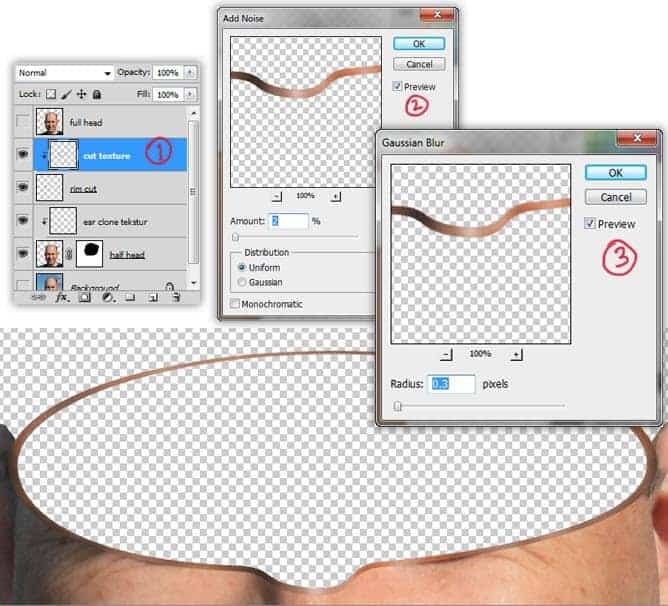
Still in the cut texture layer, add grainy noise to it by using Filter> Noise> Add Noise. Set the Amount:2% and then OK.
Blur the noise using Filter> Blur> Gaussian Blur with radius value around 0.3.
Step 17
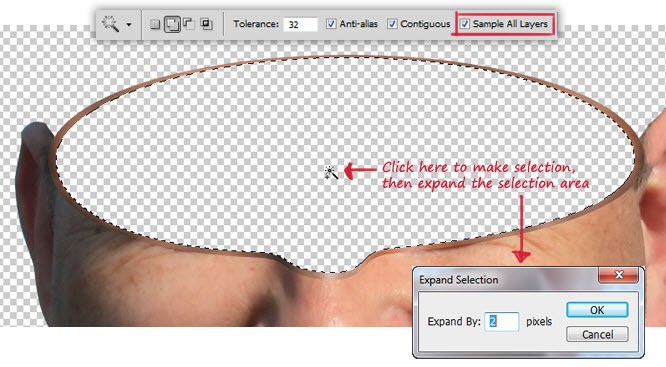
The �hole� inside the circle need to be fill with texture. Select it easily using Magic Wand tool (make sure the sample all layers option was checked!).
As like the previous steps, expand the selection around 2px value.
Step 18
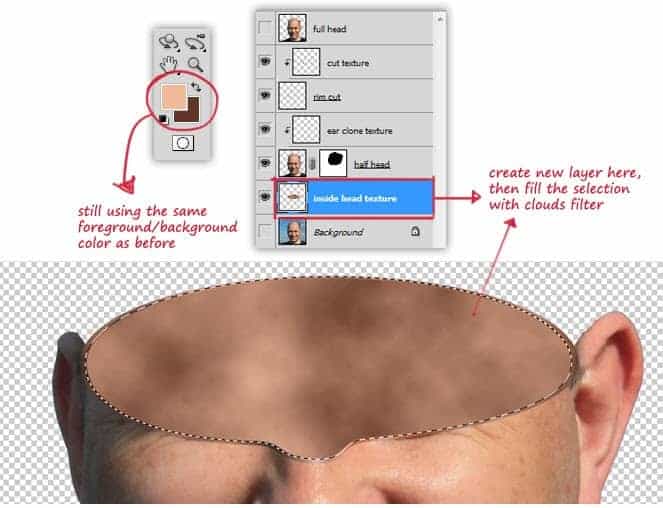
Add new layer beneath half head layer, name it �head texture�. Use the Cloud Filter again to fill the selection (notice that we�re still using the same foreground/background color as before). Don�t forget to deselect when done.
Step 19
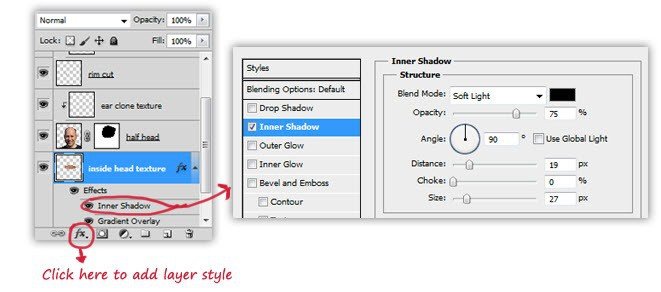
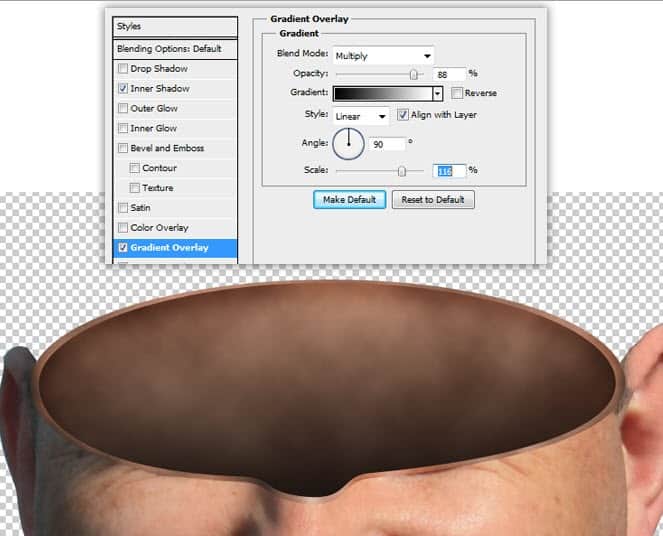
We will use gradients and filters. Click �Add a layer style� small icon in the bottom part of the Layers Palette. Apply �Inner Shadow� and �Gradient Overlay� styles. Use setting and colors just like on the screen shots below.
Inside the Inner Shadow setting, change blend mode to soft light, increase Distance and Size value.
While in the Gradient Overlay setting, set the gradient color to black and white, select multiply blend mode, increase Opacity to 80%. Make sure Angle is set to 900 and the Scale is increased to 116%.
Step 21
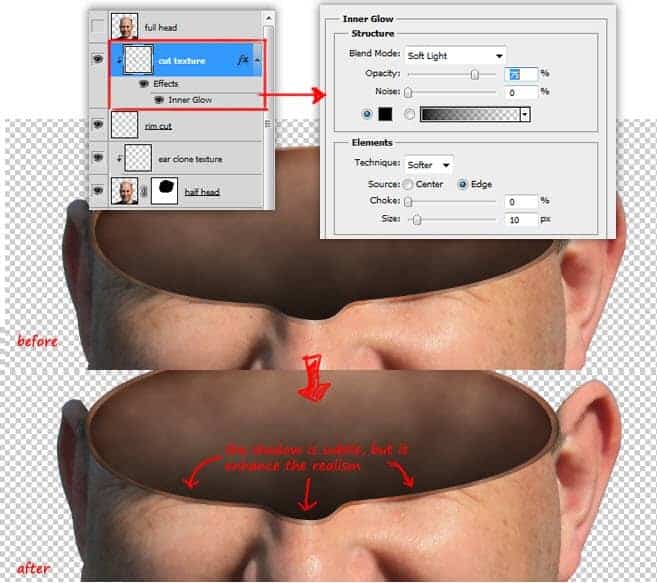
We need to add inner shadow inside the cut texture. To do this, add Inner Glow layer style for the cut texture layer. Why not use Inner Shadow but Inner Glow instead? I personally like the softer result from the inner glow layer style, and it was easier to control. Follow the instruction in the image below and you�ll be OK.
Step 22
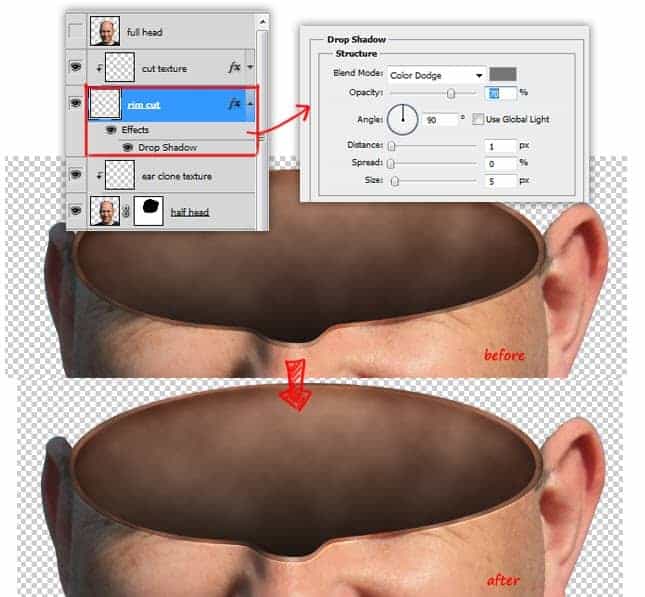
Apply Drop Shadow to rim cut layer. Use grey as the Drop Shadow color. Select Color Dodge blend mode, set Angle to 900, adjust Distance: 1px and Size: 5px. By Following this setting, you will get a nice highlight color beneath the rim cut.
Step 23
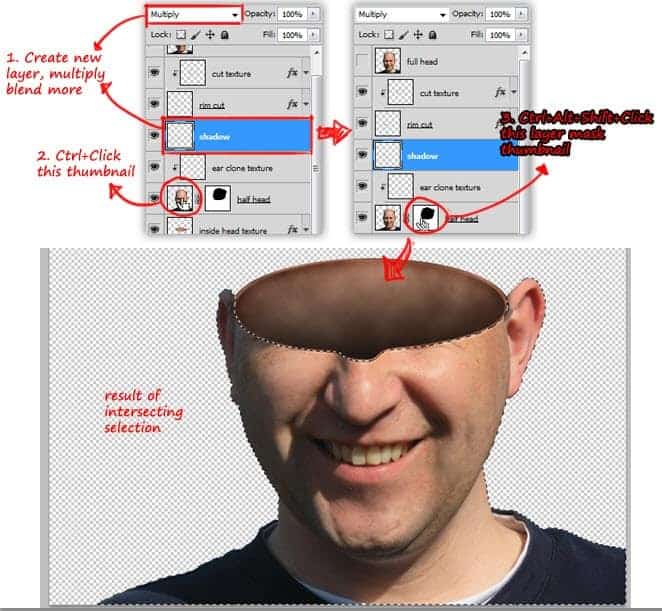
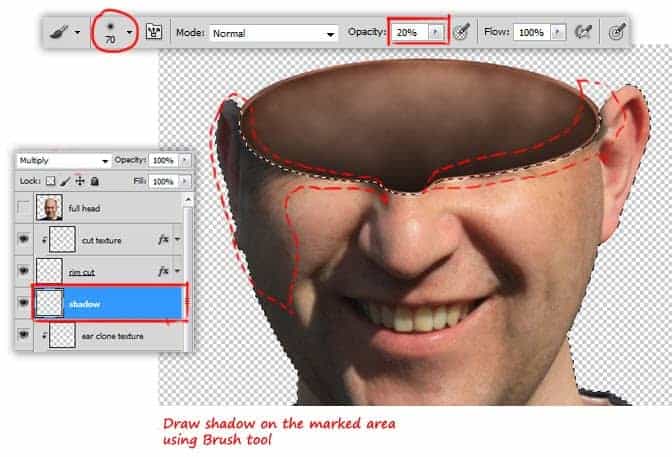
Create new layer beneath rim cut layer, name it �shadow� and set Multiply as the blend mode. Ctrl+Clickon the half head layer thumbnail to create a selection. Next, hold Ctrl+Alt+Shift while clicking half headlayer mask thumbnail. This action will intersect both of the selection.
Step 24
Inside the selection, draw shadow in the marked area. Do this by using black soft round Brush tool with low opacity, and make sure you draw it in the shadow layer.
Step 25
We�re done with �creating a hole in head� parts. We need to pay attension with the background now.
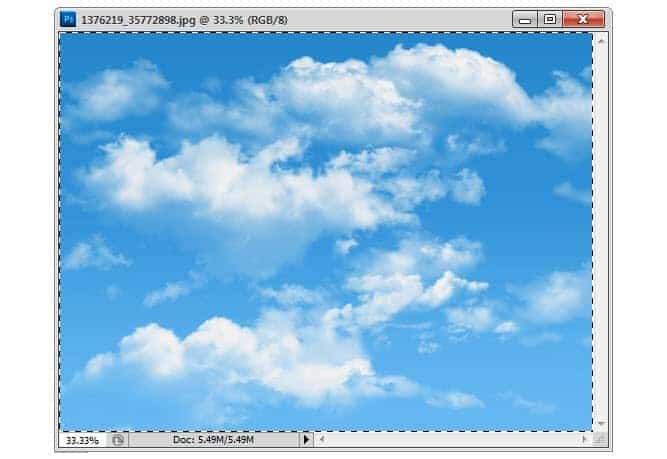
Open up the cloud image. Go to Select> All and then press Ctrl+C to copy it to clipboard.
Step 26
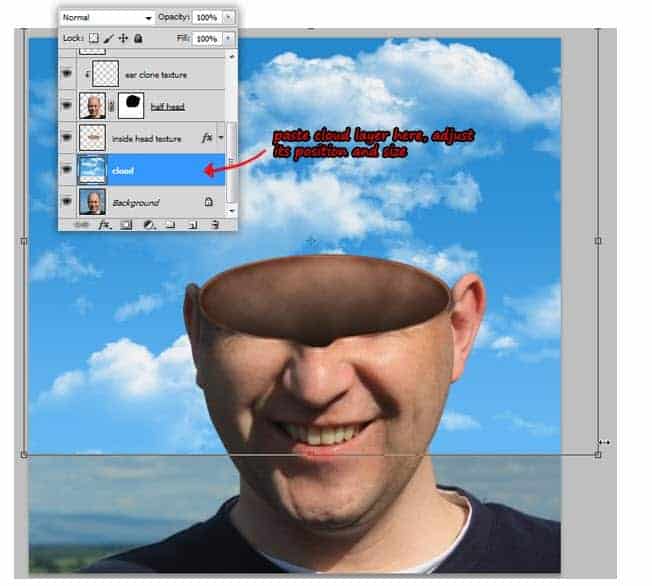
Paste the image into our scene, you may rename the layer to �cloud� or something like that. Select and show background layer again. Using Free Transform (simply press Ctrl+T), set the position and size of the cloud so it will cover � of the background area. Press Enter to confirm transformation.
Step 27
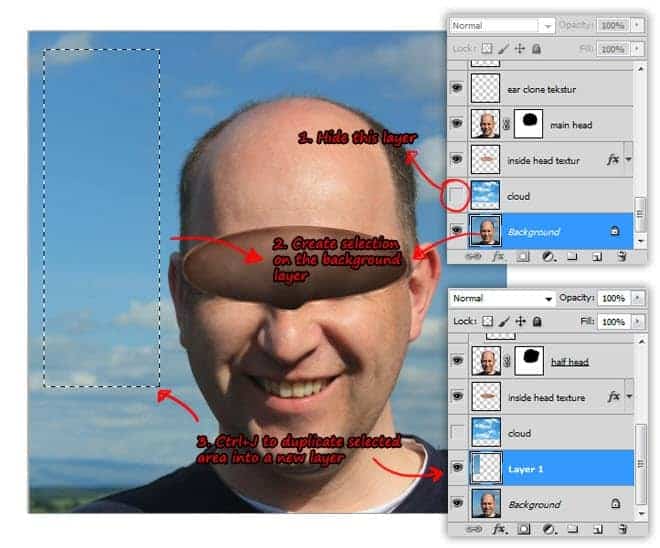
Make the cloud layer invisible. Select background layer, and then use Rectangular Marquee tool to create selection as shown in the image below.
Press Ctrl+J to copy selected area into a new layer, which is later will be our reference to match thecloud and background layer color�s.
Step 28
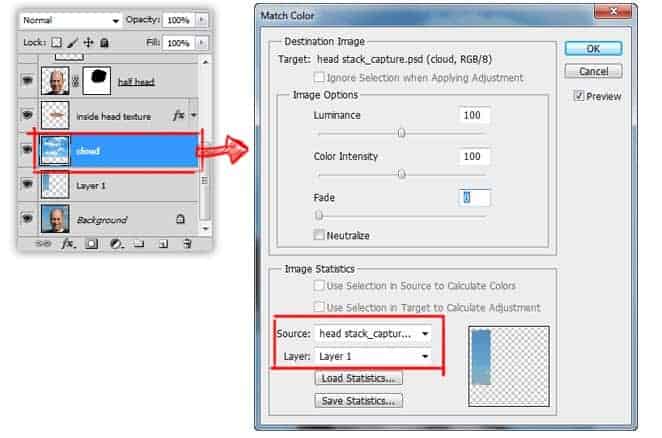
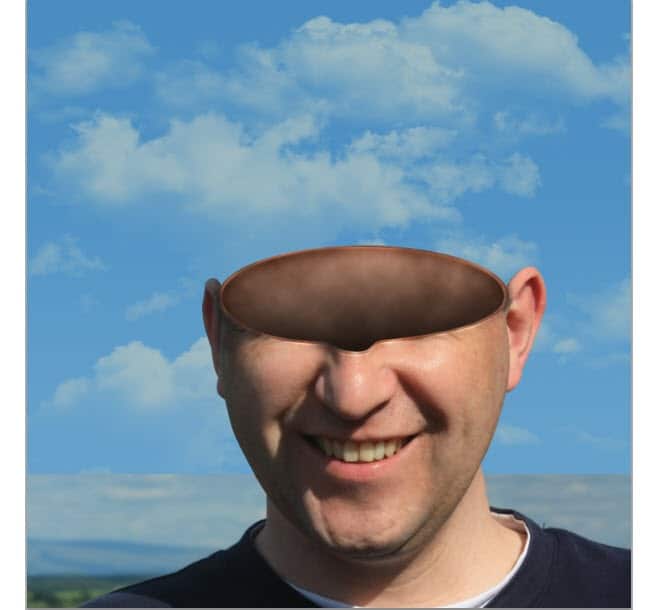
The next step is to get all the colors to match, so go to Image> Adjustment> Match Color. In theSource box, select the PSD file that you�re working in. In the Layer box, select the �layer 1� (the new layer we get in Step 27) as the reference layer. You can use Image Option sliders to fine-tune the color correction. Click OK to confirm Color Match.
Step 29
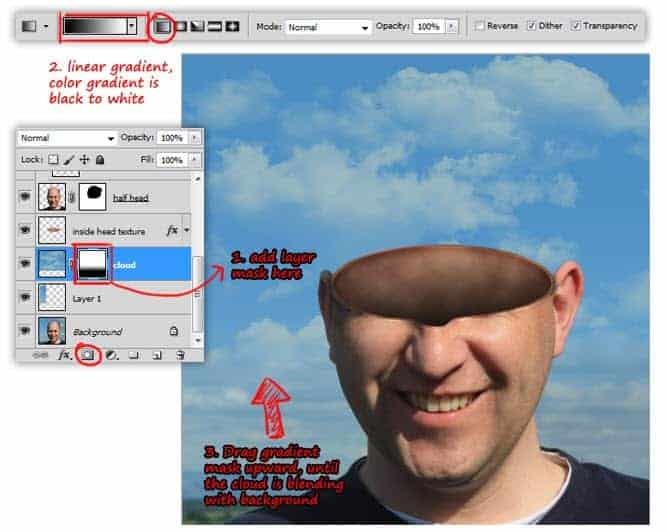
Add a layer mask to cloud layer, use Gradient tool to blend the cloud with the background.
Step 30
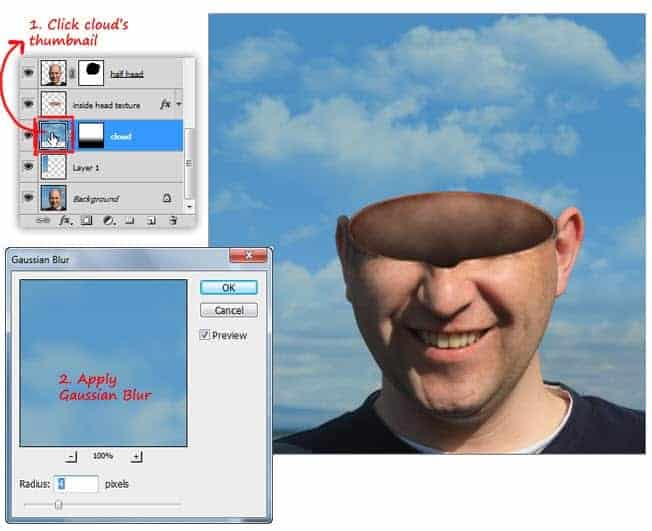
Click on the layer cloud�s thumbnail to deactivate the layer mask. Blur the cloud image a little by usingFilter> Blur> Gaussian Blur.
Layer 1 is no longer needed, delete it if you want to.
Step 31
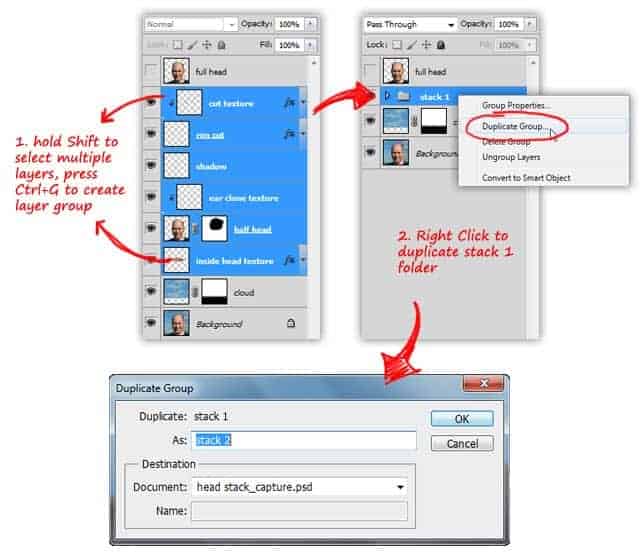
Select all layers between the cloud and full head layer (hold Shift to select multiple layers), then pressCtrl+G to group them. Right click on the group to make a copy of it.
Step 32
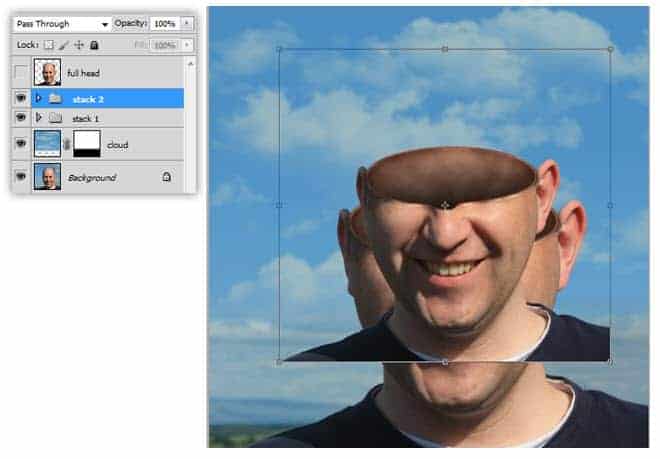
Using free transform command, adjust the size and position of group stack2 as shown in the screenshot below.
Step 33
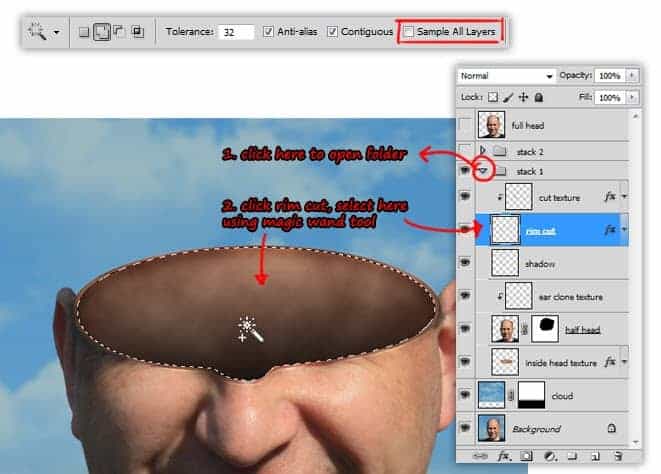
Hide the stack 2 group. Open up the stack 1 group and then click the rim cut layer. Create a selection inside the hole using Magic Wand tool (uncheck Sample All layers option!).
Step 34
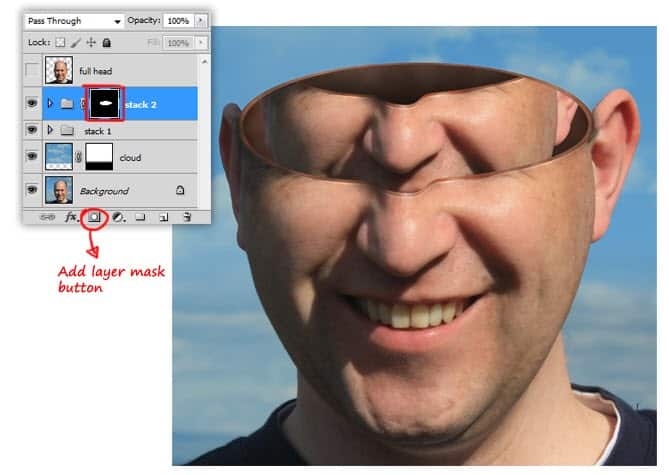
Go back to the stack 2 group and make it visible again. Click add layer mask button to change selection into a layer mask for the stack 2 group. You can see the result of this step in the image below.
Step 35
Continue masking until the upper part of head is visible again. Use white Brush tool with 100% opacity to do this step.
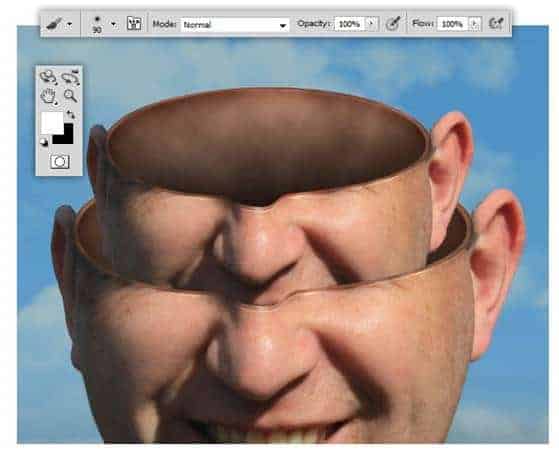
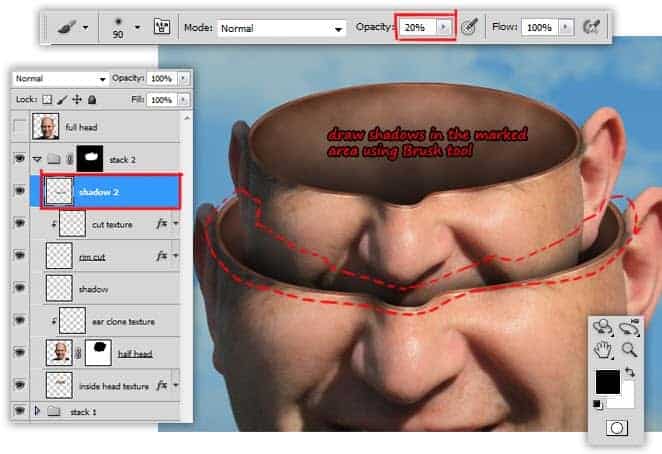
Step 36
Create a new �shadow� layer inside stack 2 group. Using low opacity soft Brush tool (color is set to black), draw some shadows in the marked area.
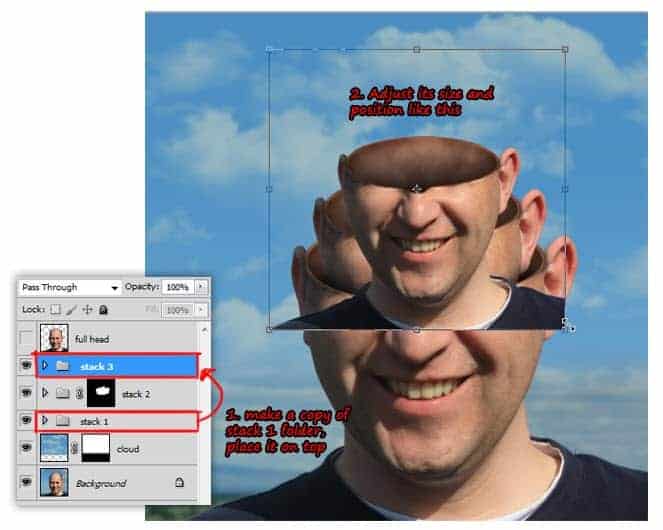
Step 37
Make a copy of stack 1 group once more, place it on top of other groups. As usual, transform its size and position as shown in the image screenshot.
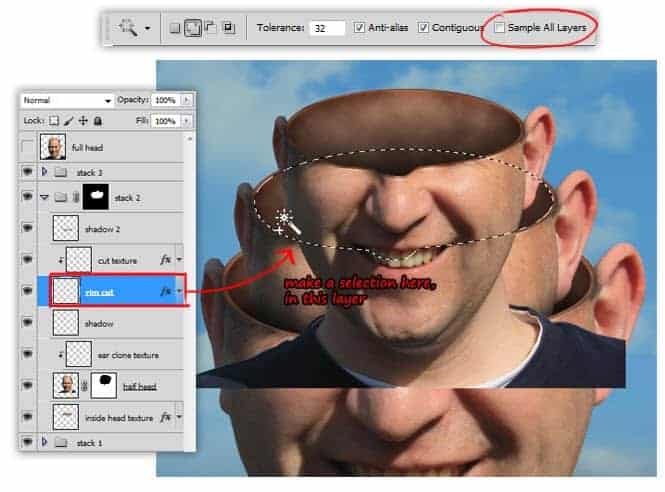
Step 38
Hide the stack 3 group. Open up the stack 2 group and then click the rim cut layer. Create a selection inside the hole using Magic Wand tool once again.
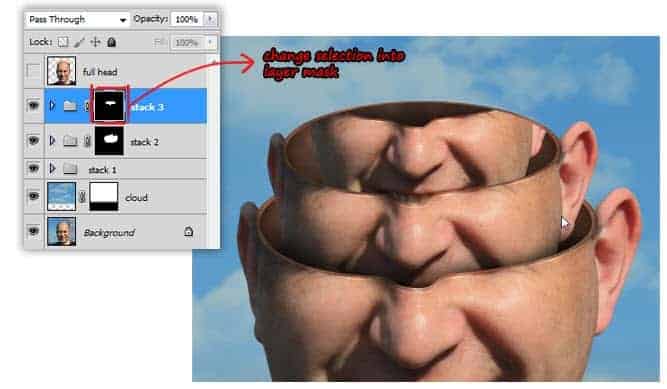
Step 39
Go back to the stack 3 group and make it visible again. Click add layer mask button to change selection into a layer mask for the stack 3 group. You can see the result of this step in the image below.
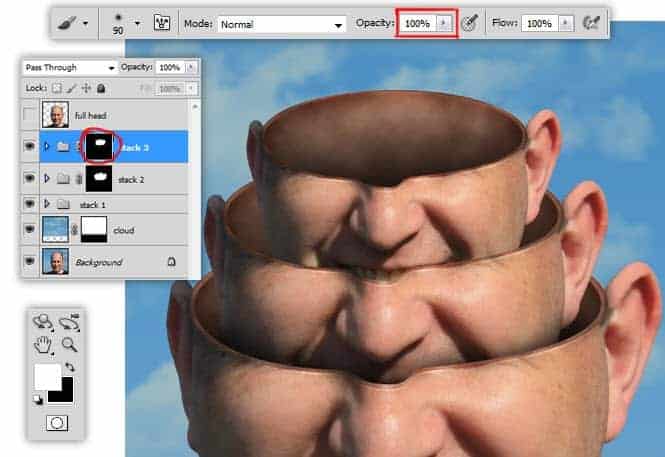
Step 40
Continue masking until the upper part of head is visible again. Use white Brush tool with 100% opacity to do this step.
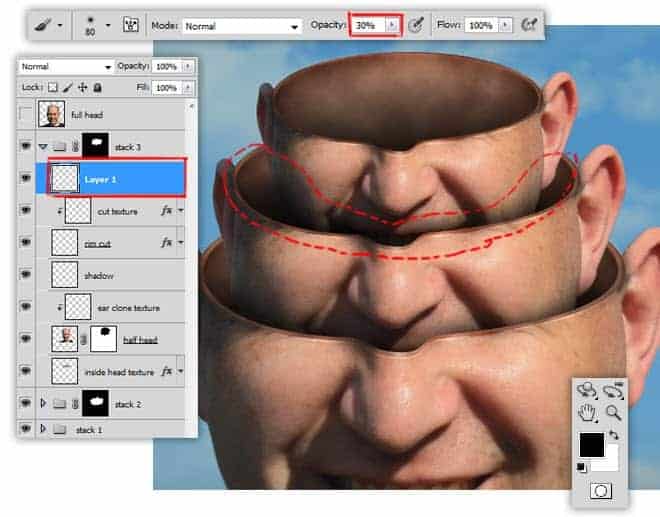
Step 41
Create a new layer inside stack 3 group. Using low opacity soft Brush tool (color is set to black), draw some shadows in the marked area.
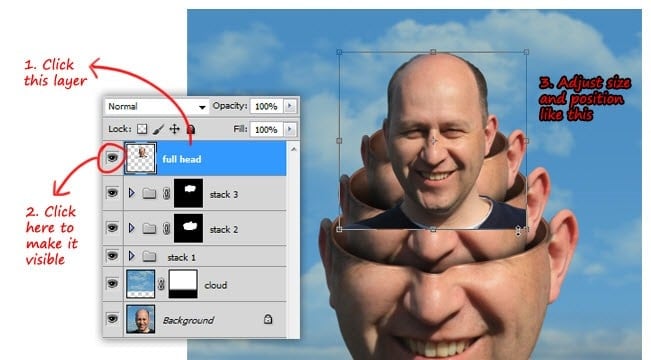
Step 42
Select the full head layer, and then make it visible. Transform its size and position as shown in the image screenshot below.
Step 43
Open up the stack 3 group and then click the rim cut layer. Create a selection inside the hole usingMagic Wand tool.
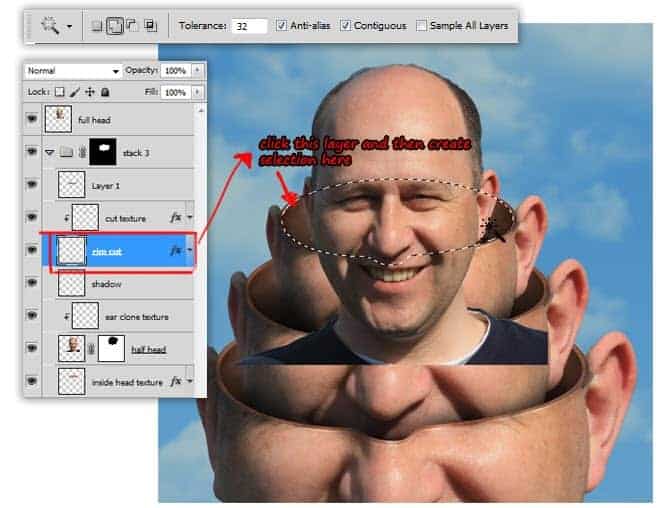
Step 44
Like in the previous steps, change the selection into a layer mask for the full head layer. Use white Brush tool with 100% opacity to continue masking, until the upper head part is fully shown again.
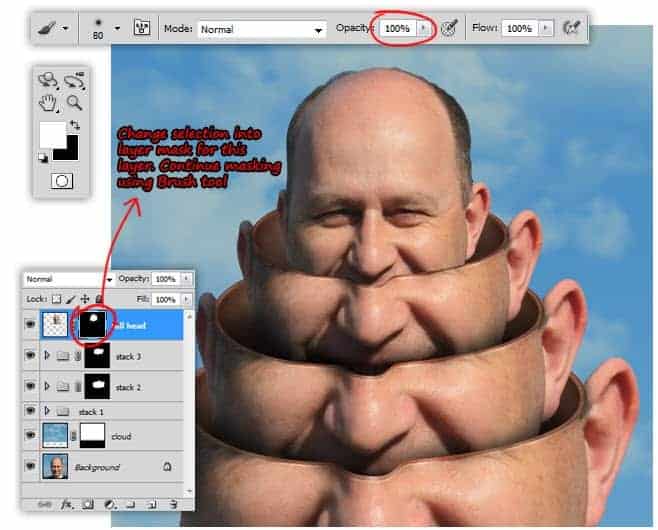
Step 45
Create a new clipping mask layer above the full head layer. Draw shadow on the marked area using low opacity Brush tool (color is set to black).
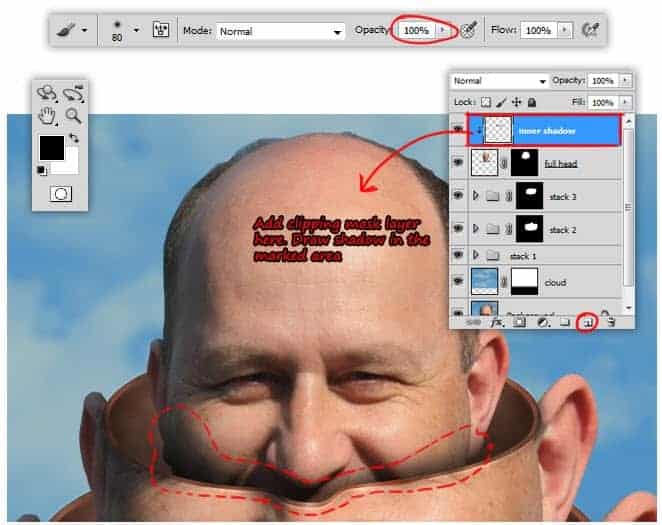
Step 46
Add new layer below full head layer, and then continue drawing shadow beneath the head. We�re done with the main illustration, next we�ll applying color correction and adding a nice white frame.
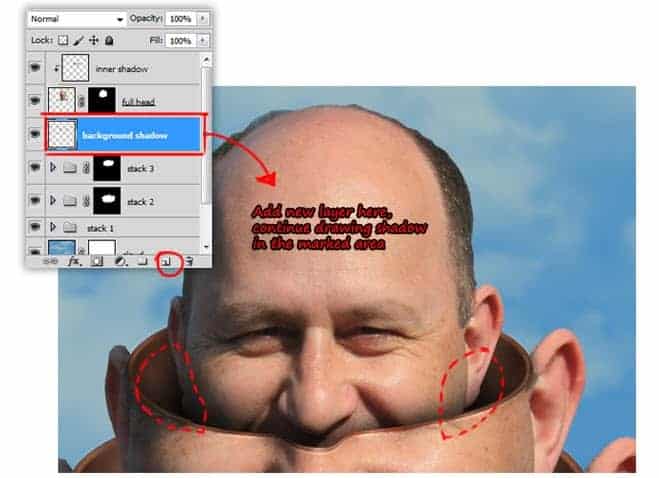
Step 47
We�ll using adjustment layer to do color correction. With this method, we can modify the setting easily without losing any image information.
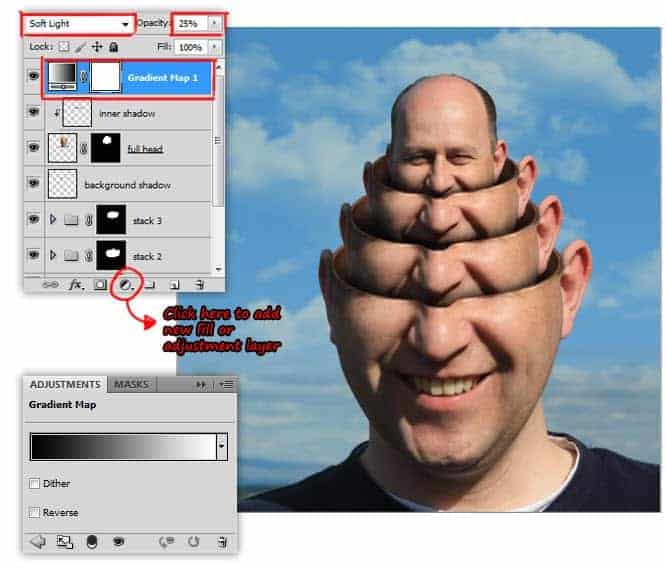
Inside the layers panel, click on the Create new fill or adjustment layer button, apply for theGradient Map adjustment layer. Select the black and white color gradient.Change the layer blend mode to Soft Light and reduce Opacity to 25%.
Step 48
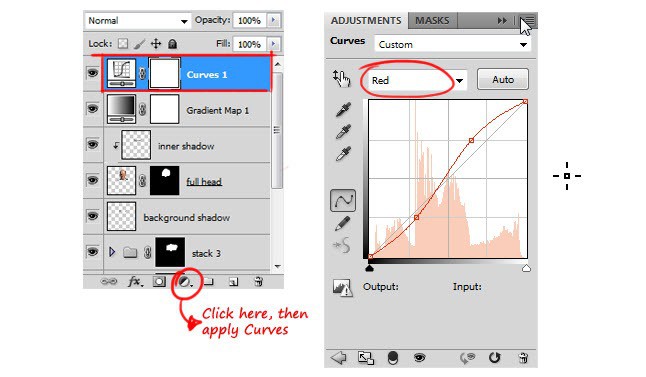
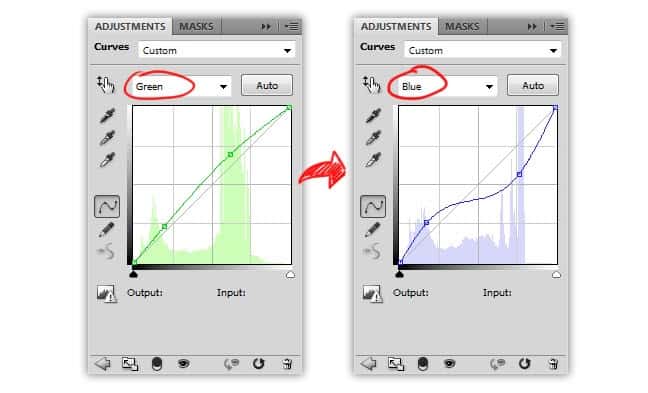
Next, apply for the Curves adjustment layer. Manually change the curve in each channel (Red, Green and Blue). Use settings just like on the screenshots below.
Step 49
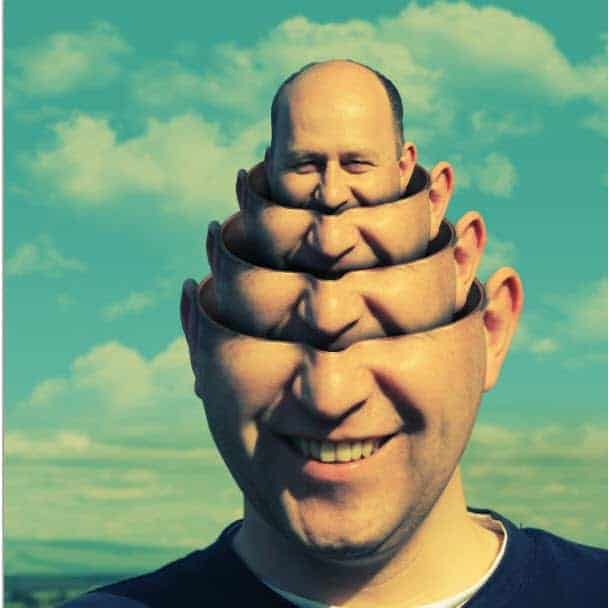
Here is the image result if you follow the Curve settings in Step 48.
Step 50
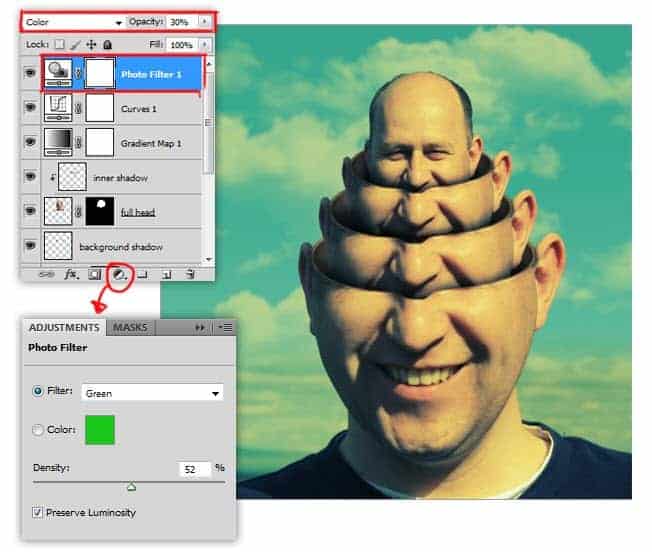
This step is optional: To enhance the surreal feel, I think the overall image need to be more green. So I apply the green Photo Filter withincreased Density value. Change blend mode to Color, set Opacity: 30%.
Step 51
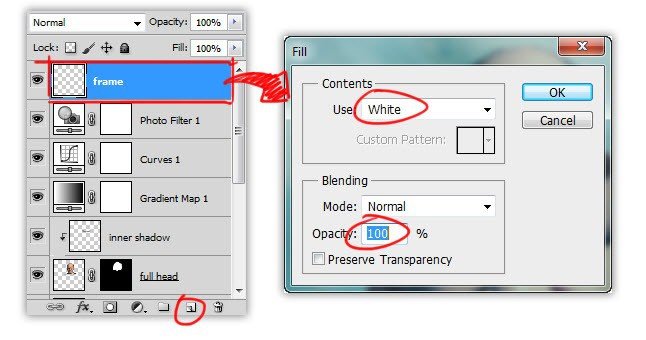
Add a new �frame� layer on the topmost of layer stack, fill it with white.
Step 52
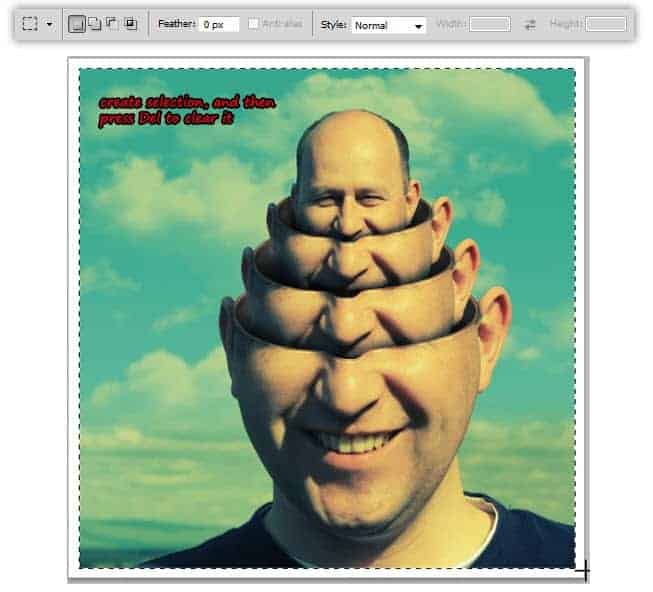
Using Rectangular Marquee tool, create a selection like in the screenshot below. Press Delete to clear the selected areas, there you go! the frame is done. Don�t forget to deselect and Save your work.


0 Comments: